Saturday, May 30, 2009

The Project is Almost Finished

I've asked a few people how they find time between the coming and going of things to do and done, how do they slip in time to blog daily. I say that as an apology for not getting the next step in the Christmas decoration up sooner. It's been ready. The photo is cropped. The words are written. So, I guess I'm a hopeless procrastinator. Well, maybe not hopeless -- I'm more or less a pseudo-procrastinator. :)

So let's get on to this step of the project we've been working on ... If we're careful, we might get it finished so readers will be able to make a few of these before it's time to decorate the tree.

Notice the picture? It's the same one as the last post displayed except this one has been spray painted with some left-over stuff I got at my local Restore (Habitat for Humanity). I also put a "hook" on the top just by pushing some string through the paper and adding a drop of hot glue inside to hold it in place. I did this before spray painting.

From here on, the choices to really shine with these depends on your creative bent. I'll work on this one for a while until I'm happy and then I'll post the final product.

Have you tried to make this yet? Remember, Christmas comes around before you've regifted all the nice but unneeded and unwanted items you received last year. Time's a-wasting.

Saturday, May 9, 2009

Beginning to Take Shape

I don't think I need to explain how we got to this part of the egg carton experiment. The previous post shows the two halves; this one shows them glued together. I use a good quality white glue because I get better coverage but hot glue will work as well. Just make sure every point of contact has glue on it.

Once the glue dries (and it doesn't take long), test the strength by tugging lightly from each end. See, sometimes the glue soaks into the paper and isn't strong enough. If you see gaps, fill them with glue. If the pieces come apart, glue again.

Now the the glue is sturdy enough, use a nail file to get rid of any loose shards of paper. Then dampen your fingers with water and rub them along all the open edges. This will help smooth out the paper completely.

Saturday, May 2, 2009

Eggsactly: Step Two

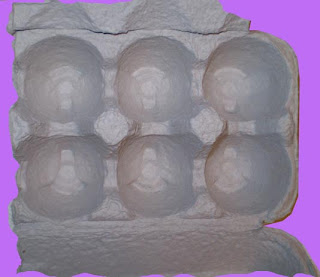
Okay, so you read the previous post and easily knew the photo was half an egg carton. You know, those gray, cushy cartons you get at the store when you buy a dozen (in this case a half-dozen since I don't eat a lot of eggs). I think these cartons decompose fairly easily in the landfill but why not reuse them for something different and lasting? (By the way, it takes a little bit of dusting and filing to get the cut pieces to look even this good.)


Our first step then is to get a sharp craft knife. These suckers tear up your blades so be ready to change them frequently. (On the other hand, if you can figure out a better way to cut egg cartons, let me know.)
You can see from this photo how to cut the carton. If you're really, really good at the cutting phase you can get eight good segments that will make four final items.
Next post, I'll show how the pieces look as the come closer to the final phase.

Eggsactly

Can you guess what the picture is? If the title of this post doesn't give you a clue, well you will have to go deep into the recesses of your creative mind to figure out what this will look like eventually. I'll give you a clue ... Next Christmas, your tree will have a totally new "do."

I can't believe it's been almost two months since I last posted but since life is a target and there are so many people and events taking aim at it, I'm not surprised that blogging had to take a back seat for a while. At any rate (I love that phrase), I'll be updating this mystery in a day or two. But please post a comment if you think you know where this is going.